

As many teachers around the world have moved from face to face teaching to online teaching, we’ve decided to change the focus of these blog posts too. For the next few months Look author Katherine Bilsborough will be sharing ideas of how to use an image as a springboard for online language work with your primary students. Some ideas will be for synchronous learning, using a chat box for interaction. Other ideas will be for tasks that students can do offline and then, where appropriate, share their work in a later lesson. These are ideas that you can use or adapt to suit your unique teaching context. If you use any of them, we’d love to hear how it went. And if you have any tips or advice for other teachers, we’d love you to share them.
Imaginary instruments
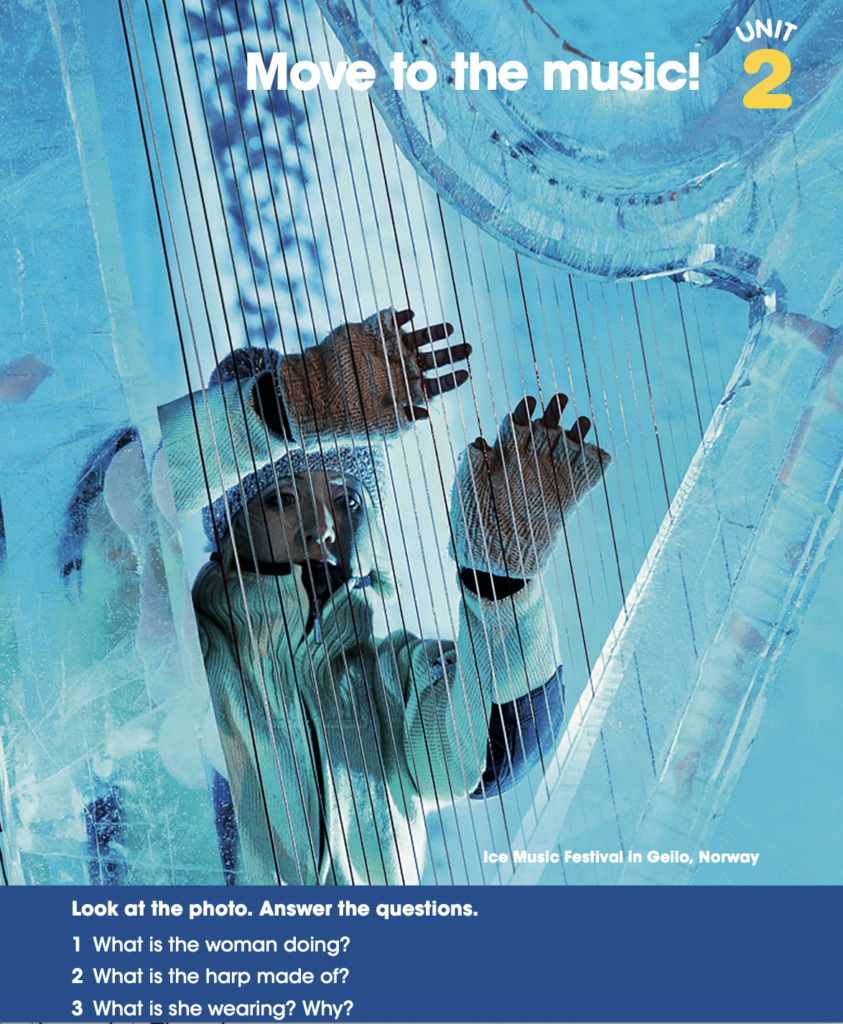
The photo we will use is from Look Level 4. In this lesson focusing on imaginary instruments, students start off by playing a guessing game. Then they develop their critical thinking skills by answering questions which use a photo as a starting point. They do some simple language analysis work by replacing the words of a short text and then they do a creative writing task with an optional illustration. They finish the lesson with a fun activity to get them moving and stretching when they play their imaginary instruments and do one final, self-reflection task.
Before you start
Explain that students need a notebook and a pencil or pen.
Photo lead in: What is it?
Explain to students that you are going to show them a photo for a few seconds only. They have to pay attention, look and try to see what the photo shows. Flash the photo in a slide or from your computer screen for a few seconds only. Then ask the students to say what it showed. They can write in the chat box or, if appropriate, take turns to speak using their microphones. Encourage all students to guess, even if they aren’t sure of what the photo shows. They can say things like It’s something blue, it’s a person, etc.
Flash the photo a second time so students can have a second look and clarify their initial ideas.
When students finish guessing, display the photo and comment on a few of their ideas. E.g. That’s a good guess, you were nearly right, yes, you saw the right color, etc.
Explain that this is a photo of a woman playing a musical instrument, a harp, made of ice. The photo is from a special ice music festival in Norway.
Critical thinking questions
Ask a few questions, or display them on a slide, and give students time to think about their answers. Then accept their answers orally or in the chat box. Choose some or all of these questions.
Why is the woman wearing gloves and a hat?
Why are the gloves without fingers?
What do you think the ice harp sounds like?
How long will the harp keep its shape?
How did they make the harp?
What other instruments can people make from ice?
What other things can people make from ice?
Would you like to play an ice harp? Why (not)?
Imaginary instruments: creative writing
Show this short text on a slide:
I have a harp.
It’s made of ice.
It’s big and blue.
It’s fun to play.
It sounds like a bird singing.
Listen to me play!
Read the text aloud once through while students listen and follow you. Then read it again, pausing before each word in bold, and indicating that you want students to suggest a replacement word in the chat box. Give them time to write plenty of ideas before choosing one, and continuing.
E.g.
I have a drum.
It’s made of paper.
It’s smalland loud.
It’s easy to play.
It sounds like a frog jumping.
Listen to me play!
Explain that you want students to write a new text, substituting the words in bold with words of their own. They should start by imagining an instrument made of an unusual material. If necessary brainstorm a list of unusual and funny materials.
For example: paper, glass, metal, cotton, leaves, ice, stone, feathers, grass, sand, jelly/jam, potatoes, etc.
Tell students to spend a few minutes thinking about their unusual instruments and imagining how they will look and sound.
Students copy the texts into their notebooks. This can be done offline or in break out rooms if available, where they can work with a partner, helping each other and where you can visit them to answer questions or help with vocabulary.
Optional: When students finish writing, ask them if they’d like to draw their instrument.
Students can share their finished work in a number of ways., depending on the tools and platforms you are using. E.g. They can read their texts aloud and hold up their pictures to their webcams, they can take a photo and upload it to a shared space, they can send their work to you by email (or other) for displaying, etc.
Imaginary instruments: music and movement
Tell students that you are going to play some music. They have to join in, playing their imaginary instruments. Give them instructions to listen to and follow.
For example:
Stand up and stretch your arms and legs.
Your instrument is on a high shelf. Look up. Can you see it?
Stretch your arms up and get your instrument.
Now hold it out to show me.
Are you ready to play?
[At this point, you might like to play some instrumental music for students to imagine playing along to].
Let’s play our instruments!
Now stop playing.
It’s time to put the instruments back on the shelf.
Stretch your arms up high.
Put the instrument on the shelf again.
Now sit down.
and rest.
Imaginary instruments lesson: Self-reflection for you and for your students
Finish the lesson by asking students to complete a sentence in their notebooks and then to share it in the chat box. First dictate the beginning of the sentence (below) and then tell students to think back and remember the activities they did, before writing.
The best thing about this lesson was …
Teachers: Think about the lesson. Make a few notes about each of these questions.
Were my instructions clear?
Did my students know what to do at each stage of the lesson?
Did all of the students take part in each stage of the lesson?
Did students share a range of texts and drawings that highlighted their creativity and imagination?
If I did this lesson again, would I change anything? (If yes, what? and why?)
A very nice lesson containing all the elements I think work well in kids lessons.