


Breaking Through the Screen: A Dozen Tips for Engaging Students in Online English Language Learning
Tips #10-13
Learning online can leave your students feeling isolated and unsupported. While you and your students can’t be in the same room, you can still foster a supportive learning community with and between students. Think about ways you help students in an in-person course feel they are part of a supportive learning community. Perhaps you provide personalized feedback and encourage engaging discussions with and among students. Maybe you create a clear structure and rhythm to your class, so students feel secure knowing what is expected of them during your class time. You can do the same in an online learning environment although it might look a little different. Let’s look at some strategies for building a supportive online learning environment for your English learners as well as for yourself!
Tip #10 Provide Targeted Support and Feedback
Always remember to send personalized feedback and messages of encouragement to give students the direction and support they need to push forward. Don’t forget that learning online for the first time can be challenging because students have to do two things simultaneously: 1) learn the material; and 2) learn how to learn online. In addition, if you are teaching English learners, then your students are doing both in a second or foreign language and not their native language. Keep in mind that every set of instructions in English is additional input that might be challenging for your learners.
Help Students Help Themselves
An important strategy for online learning is to teach students strategies for helping themselves. We want them to become independent learners and not rely on you to answer every single question big and small. The “3B4ME” strategy is useful for teachers in any context but can be especially important when students are learning online and encounter technological issues. If students are able to resolve their technological issues before asking you for your help, it will free you up to spend more time providing feedback on their learning. Using this strategy, students should do three things before they come to you looking for an answer.
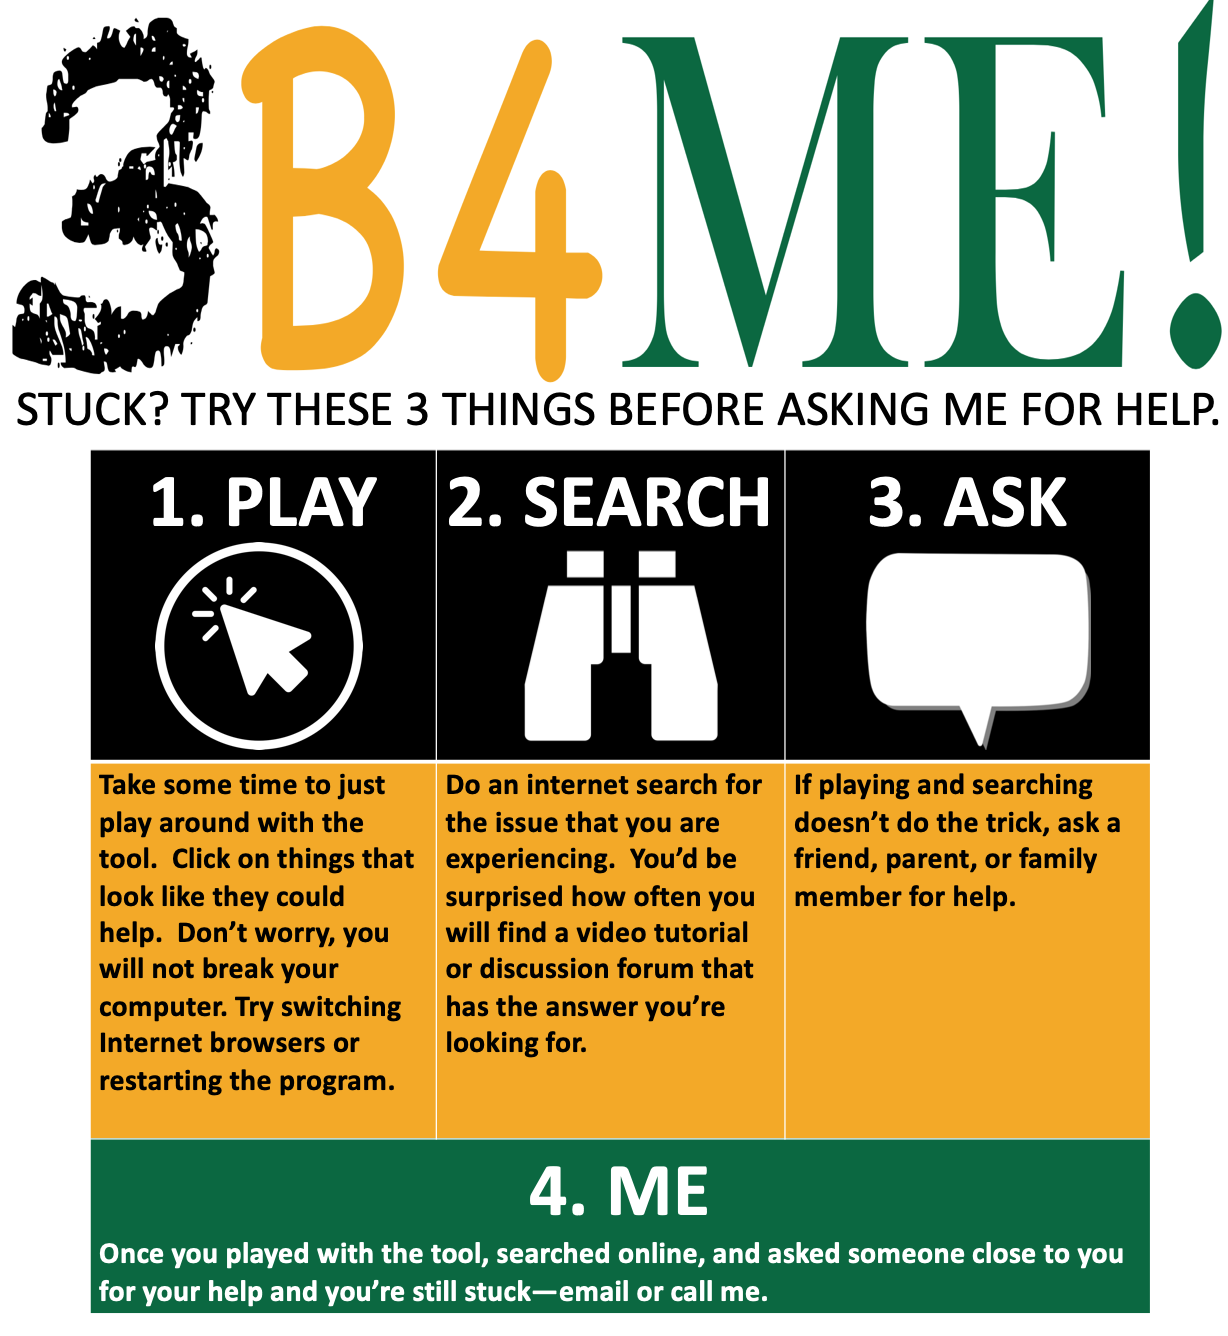
“3B4ME” graphic created by Jered Borup, CC BY
Hold Virtual Office Hours
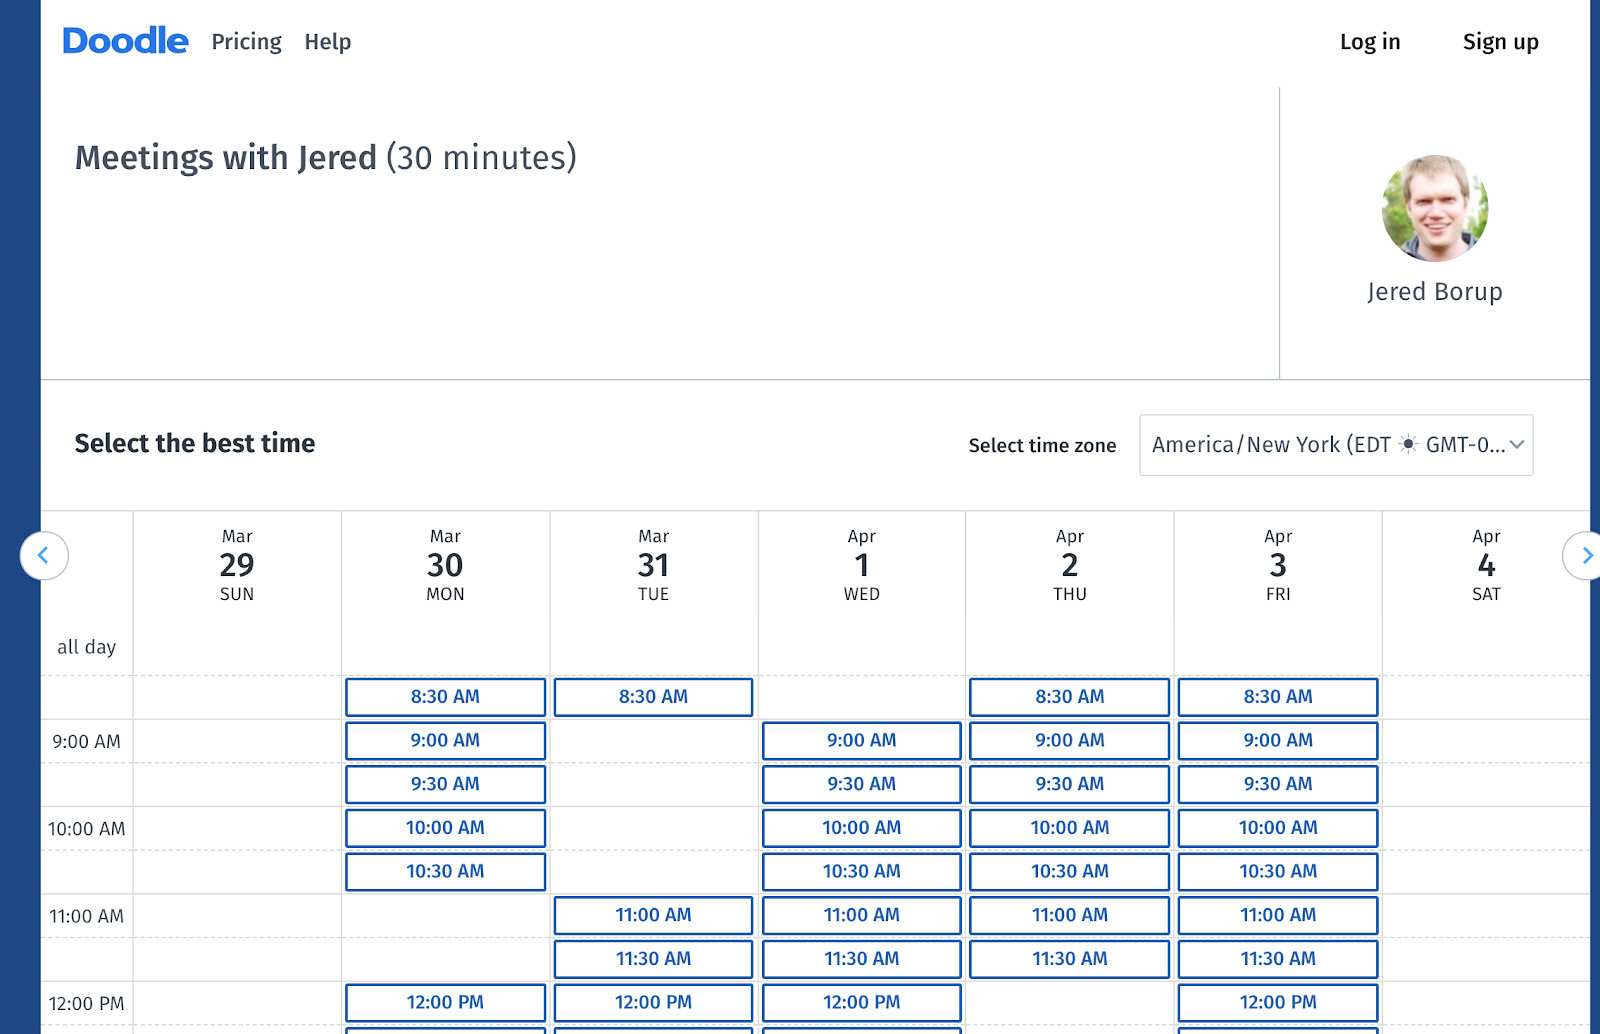
It is always a good idea to be accessible to your students. At the same time online teachers can feel burned out because they feel like they need to be supporting students at all hours of the day. Online “office hours” are a helpful way to support your students while still maintaining a balanced life. Just like in an in-person setting where students come by your office or classroom for personalized attention, online office hours provide a virtual space where students can easily find you when they need extra attention. One way is to make yourself available at certain times for virtual office hours. You can use a variety of tools to talk one-on-one with your students, such as Cisco WebEx, Skype, Google Hangouts, Blackboard Collaborate, or Zoom. Perhaps you can set a certain day and time to be there for students to pop in and talk to you. Or you can have students schedule an appointment to meet you for your virtual office hours. Doodle is a very popular tool that teachers use to set up certain days and times you are available for office hours and allow students to sign up for them individually.
See the example below that shows office hours in 30-minute slots that students can click on and reserve with their instructor.
Provide Personalized Feedback
In an online learning environment, students feel more comfortable and confident when they receive feedback that is timely, friendly, and specific, as recommended in Tip #4. One commonly used approach to giving feedback is called “The Feedback Cheeseburger.”

“Feedback Cheeseburger” created by the George Mason University’s College of Education and Human Development Online Teaching Initiative is licensed under CC BY SA
You can give both written and recorded feedback using this approach. Take a look at how this teacher gave students feedback through a video recording. Pay close attention to her use of Burger Feedback.
Provide Opportunities for Peer Feedback
You can also create a positive and productive learning community by utilizing peer feedback. Students can give each other feedback, but you have to give them a specific and friendly framework, like The Feedback Cheeseburger above. Another strategy that’s easy for students to follow is called “P-Q-P” which stands for Praise-Question-Polish. See below for simple instructions that students can use to give each other feedback on any piece of work you have assigned, such as a piece of writing, a project, a presentation, etc.

P – Praise: First, tell your classmate at least one thing you liked about his/her piece.

Q – Question: Then, ask your classmate a question about something you didn’t understand in his/her piece.

P – Polish: Last, give your classmate one suggestion for “polishing” or making the piece even better.
Images created using Bitmoji
When you ask students to provide peer feedback, you should give them a model to follow. For a lower-level writing assignment, you could show students a model like this one below:
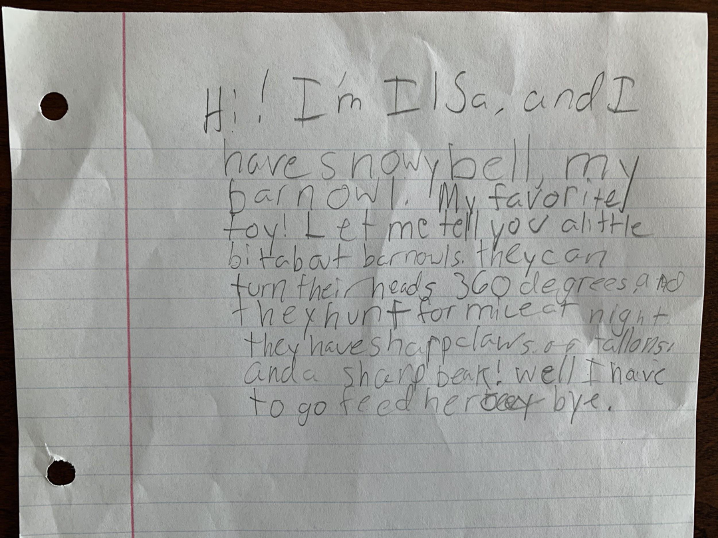
Sample Writing Assignment by Ilsa
Model of peer feedback for writing above:
P – Praise: I liked your choice of animal. You had interesting details about barn owls.
Q – Question: Why did you name your barn owl Snowy Bell?
P – Polish: Do barn owls only eat mice? How about adding other things barn owls eat?
Notice that the teacher has the following sentence starters in blue: I liked, Why did you, and How about adding. These are sentence starters that beginning level English learners can use to give their peer feedback using P-Q-P. Whether for older, more advanced learners or younger, less advanced English learners, always provide a model for them to give each other feedback in a positive and productive way.
Allow Students to Give You Feedback
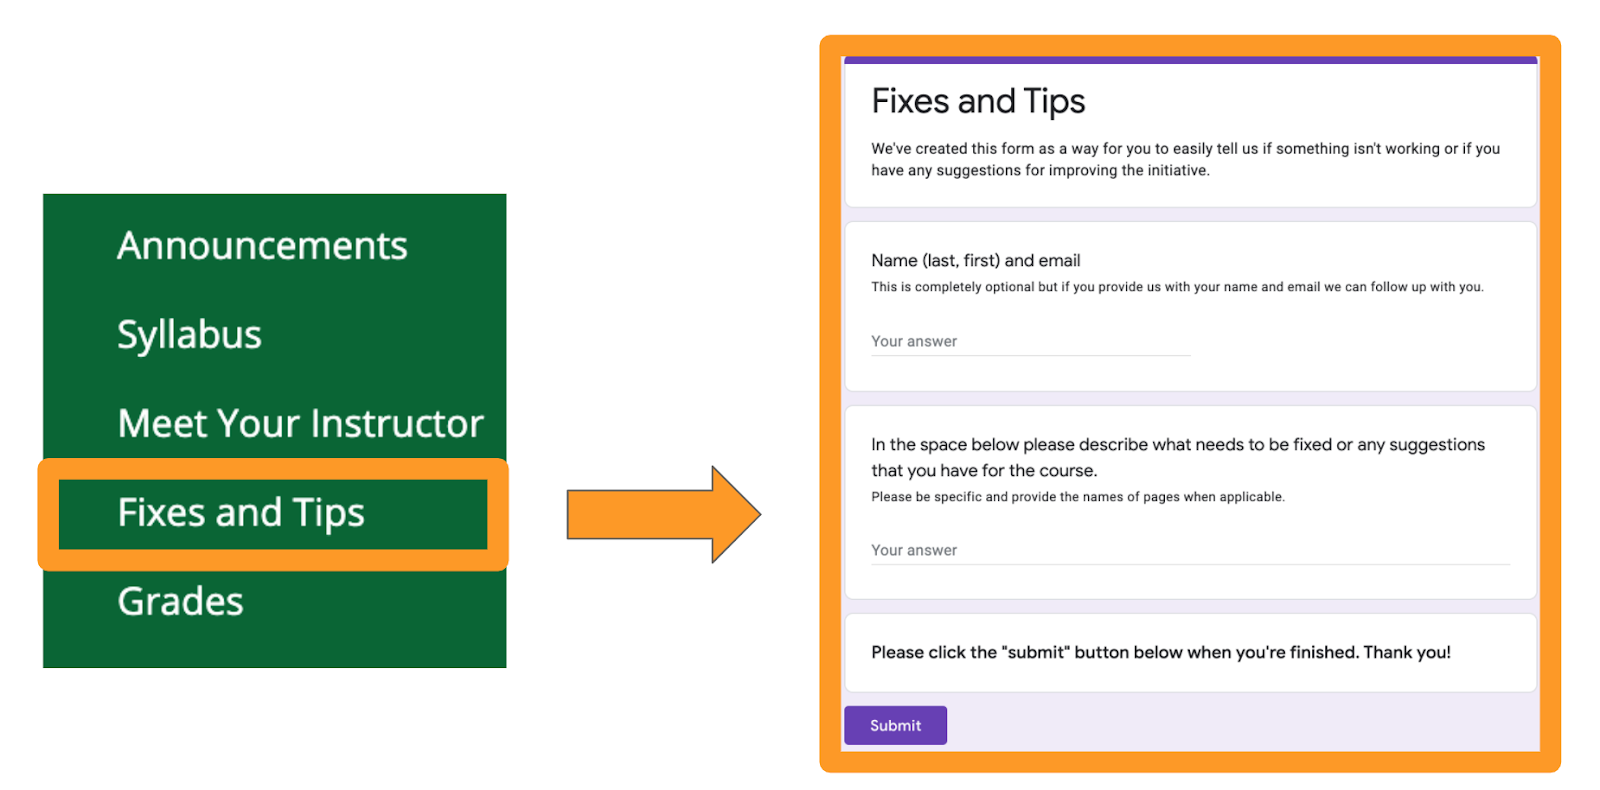
You should also encourage students to provide you with feedback on your instruction and course. John Hattie’s seminal research found that, “the most important feature was the creation of situations in classrooms for the teacher to receive more feedback about their teaching” because it created a “ripple effect back to the student” (p. 12). When teachers share a classroom with students it’s easy for them to see when students are frustrated or excited. Teachers can also quickly see when something isn’t working and more direction is needed. However, in an online environment teachers need to be more proactive at seeking feedback from students. Mid- and end-of-semester surveys can be helpful checks but often the feedback that teachers receive would have been more helpful if it was given in the moment. One strategy to receive more timely feedback from students is to create an open feedback survey that students can always access from your course’s navigation sidebar such as the “Fixes and Tips” survey that Jered Borup links to in his courses.
Tip #11 Provide Structure and a Rhythm
It is important to provide students with a structure and rhythm for your online course. You can improve student motivation by creating a clear course structure, setting clear deadlines, and posting regular announcements to encourage them. There are some simple ways you can provide structure and rhythm in synchronous sessions, where you are interacting with students live and in real time, as well as asynchronous units, where students are accessing course content and interacting with peers on-demand and at times that are convenient for them.
Create a Routine for Synchronous Classes
For live synchronous classes, you might create a routine, which can be similar to how you plan out classroom management in your in-person classes. Perhaps you have a routine that includes:
- Attendance – Take attendance and make sure everyone is present. You can do a roll call by calling out students’ names and asking them to say “Here” just like an in-person class or ask them to type a greeting into the chat box.
- Greeting – Be there early to welcome students as they join the session and then start class with a friendly routine to say hello to your students. It could be a greeting song or a few minutes to ask students to share how they are doing. If you want to make a routine of asking students how they feel, try using this Feel Wheel to expand their vocabulary and learn new words for expressing their emotions.
- Attention getters – Plan out some signals that will help you get students’ attention back on you. You could ring a bell, blow a whistle, or do a call and response, e.g., Teacher says: “1-2-3 eyes on me!” Students respond: “1-2 eyes on you!” and look back at the screen.
- Brain breaks – Plan some brain breaks to transition from one activity to the next. If students have been sitting and concentrating on reading or writing, you can get them to stand up and stretch. Try yoga poses or simple jumping jacks to refresh the body and refocus the mind. For fun, you could do a one-minute dance party and play music to get students to dance around for 60 seconds.
- Exit ticket – Assess students at the end of each class to be sure they learned something before leaving your class. You could ask a question and require each student write a one-sentence response in the chat box before giving them an Exit Ticket to log out. You could require students to submit their paper by email before they can exit the room and log out.
- Farewell – End the class with a friendly routine to say good-bye to your students. You could sing a song, say a chant, or simply say good-bye to each student by name before they log off. Sometimes a simple “You worked hard today!” or a virtual high-five can be just enough. Perhaps a routine chant can also be a nice way to end the class:
You were wonderful!
You were great!
See you next class!
And don’t be late!
Below is a Routine Chart that can be helpful to make sure you plan out each routine carefully to create a familiar structure to your synchronous classes. Notice that in the middle is “The Lesson,” which represents your lesson plan for the day using your typical lesson plan format that focuses on your lesson objectives and content. Surrounding the lesson plan are all the routines that you can set up and prepare for. Use the chart to make a plan for routines that your students will like and respond positively to.
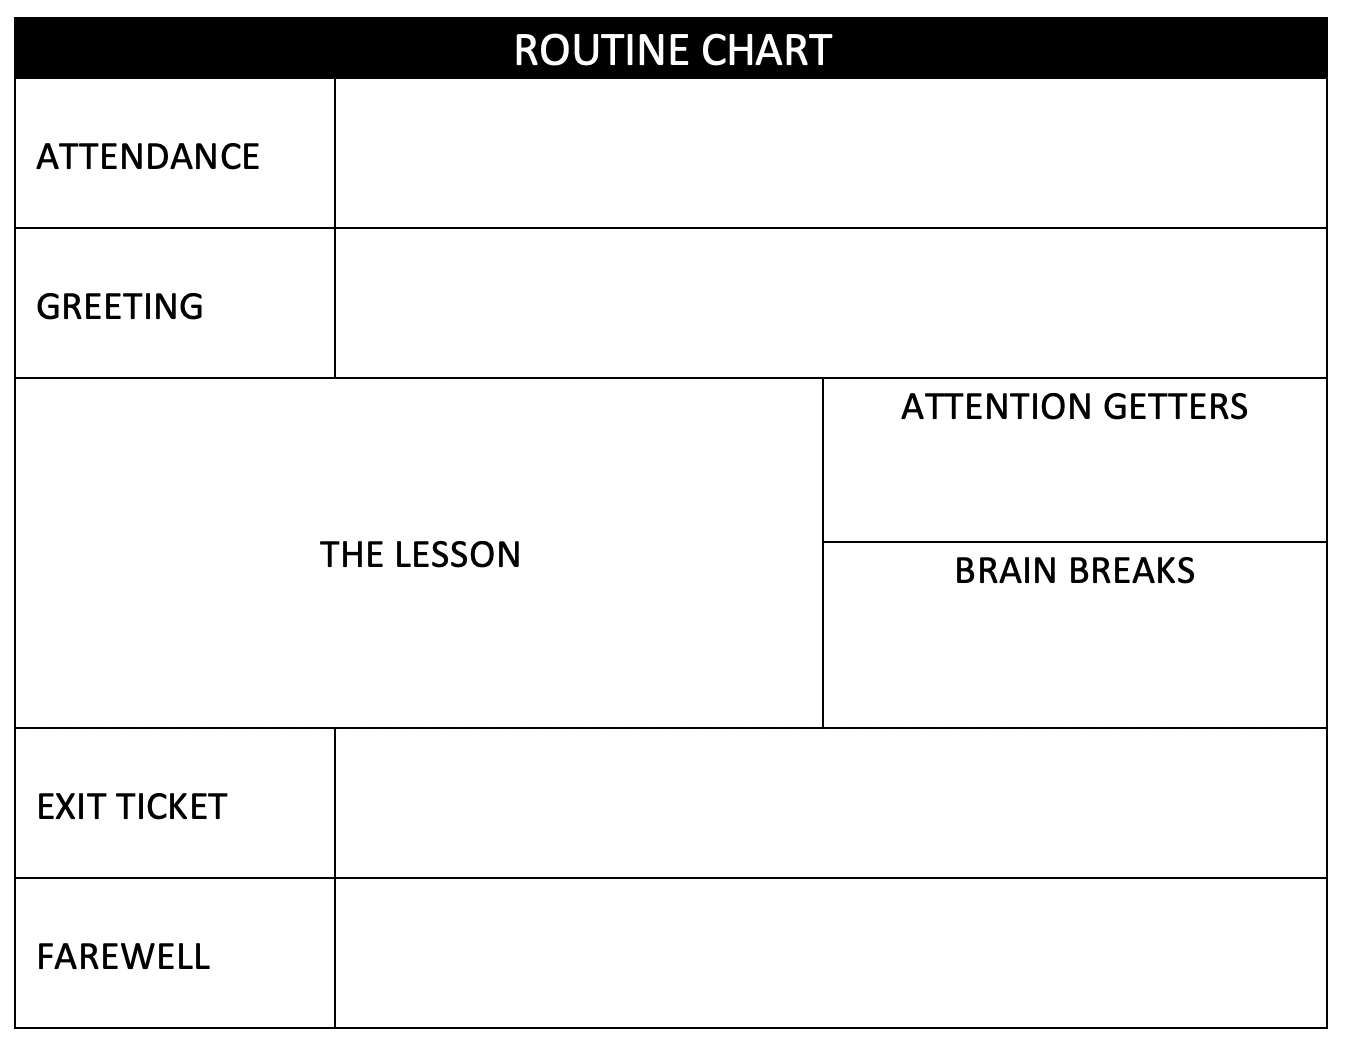
“Routine Chart” graphic created by Joan Kang Shin, CC BY
For examples for each part of the Routine Chart, you can watch this corresponding webinar.
Create a Routine for Asynchronous Classes
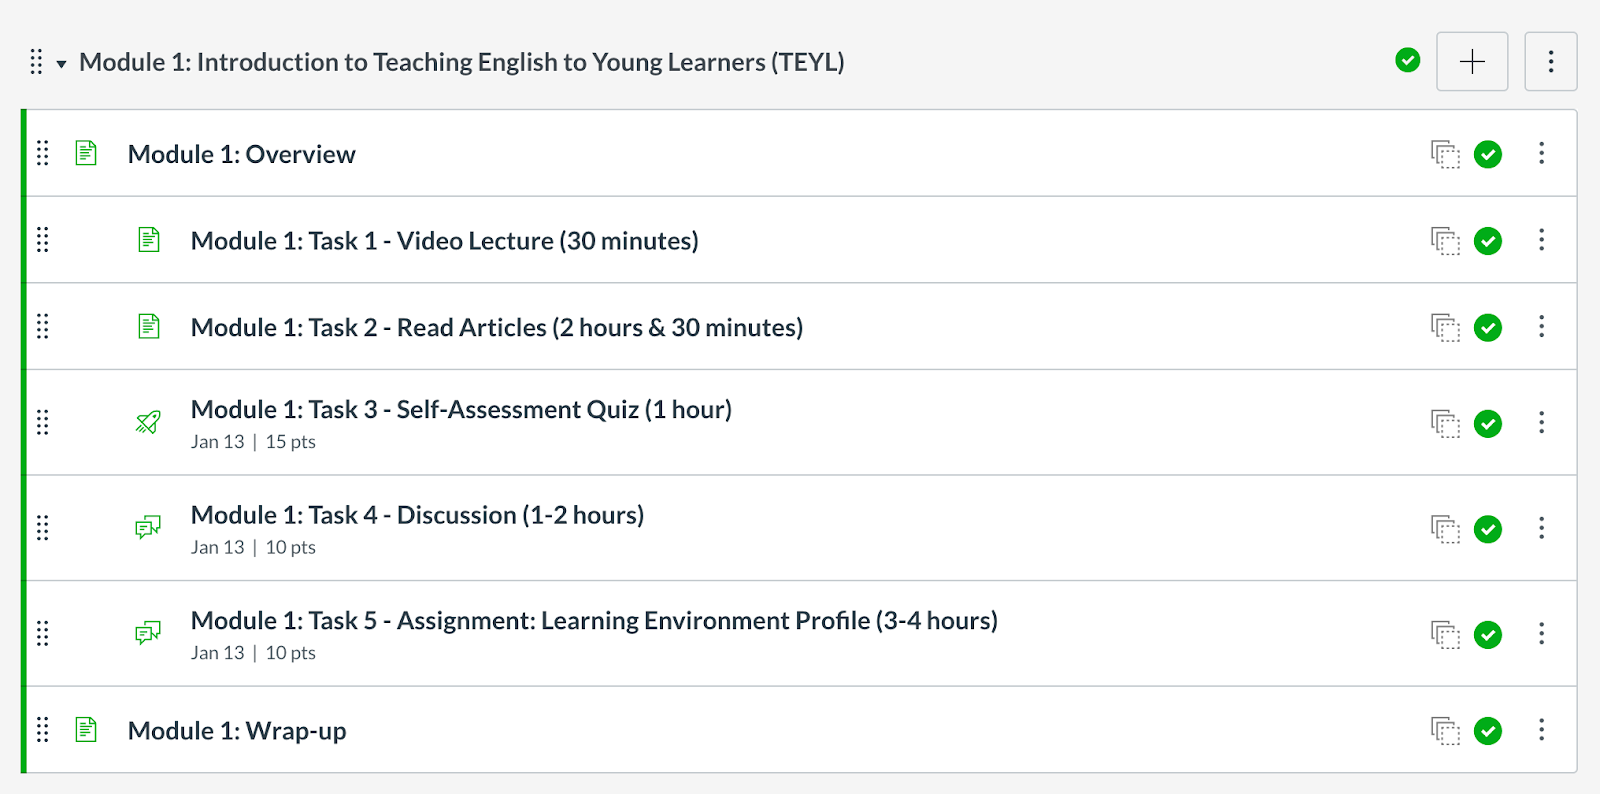
When designing a course for on-demand, asynchronous course work, it is also important to develop a clear, consistent structure that also provides a predictable routine for your students. Having the similar types of tasks presented in a similar order is helpful for your students to know what to do, when to do it, and how to find all the relevant information needed. Below is an example from the American English E-Teacher Program online course called Teaching English to Young Learners. Each module in this course follows the exact same structure with Tasks 1-5 the same every week.
From the American English E-Teacher Program course Teaching English to Young Learners developed by George Mason University, administered by FHI 360, and sponsored by the U.S. Department of State
In each module page, there are clear instructions in the same format each time. Below is an example from the Module 1 – Task 1 page, which shows the videos that students need to watch.
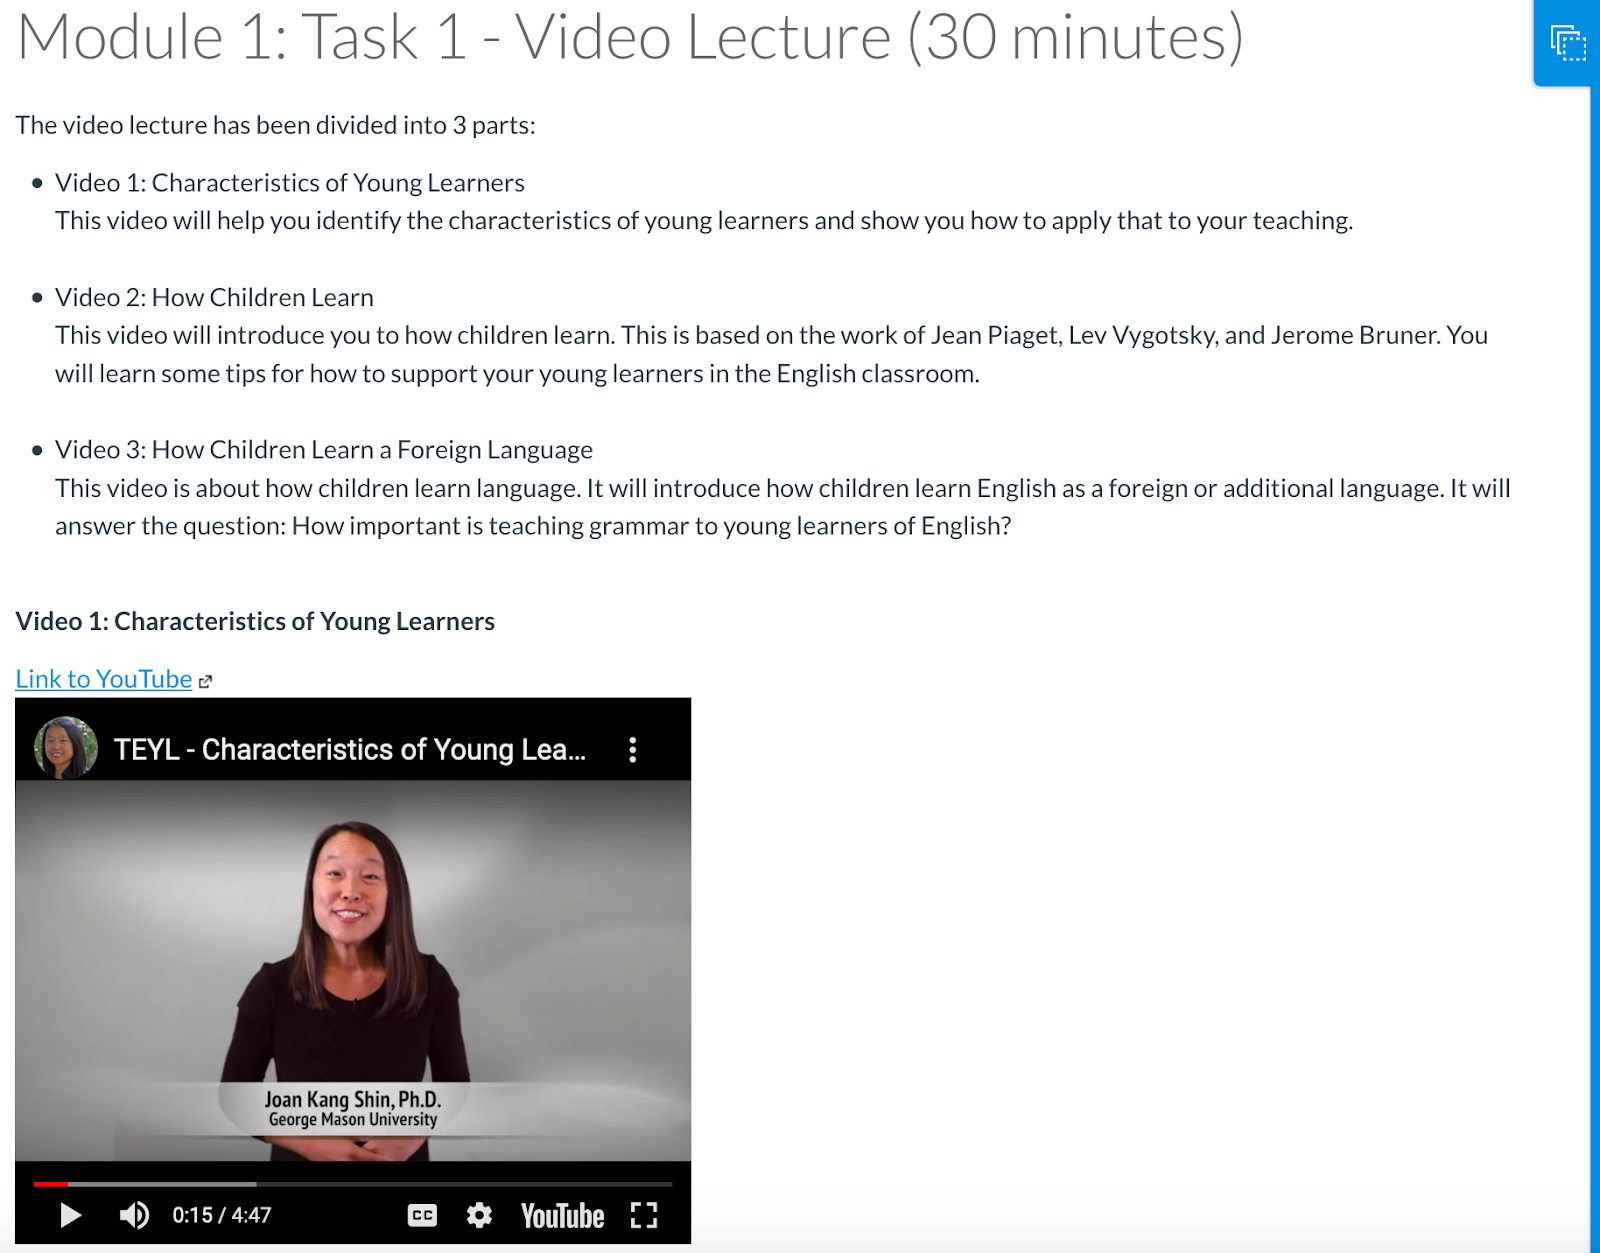
From the American English E-Teacher Program course Teaching English to Young Learners developed by George Mason University, administered by FHI 360, and sponsored by the U.S. Department of State
In the Wrap-up page, students receive a checklist, so they are very clear about what they need to do to complete all tasks in the module.
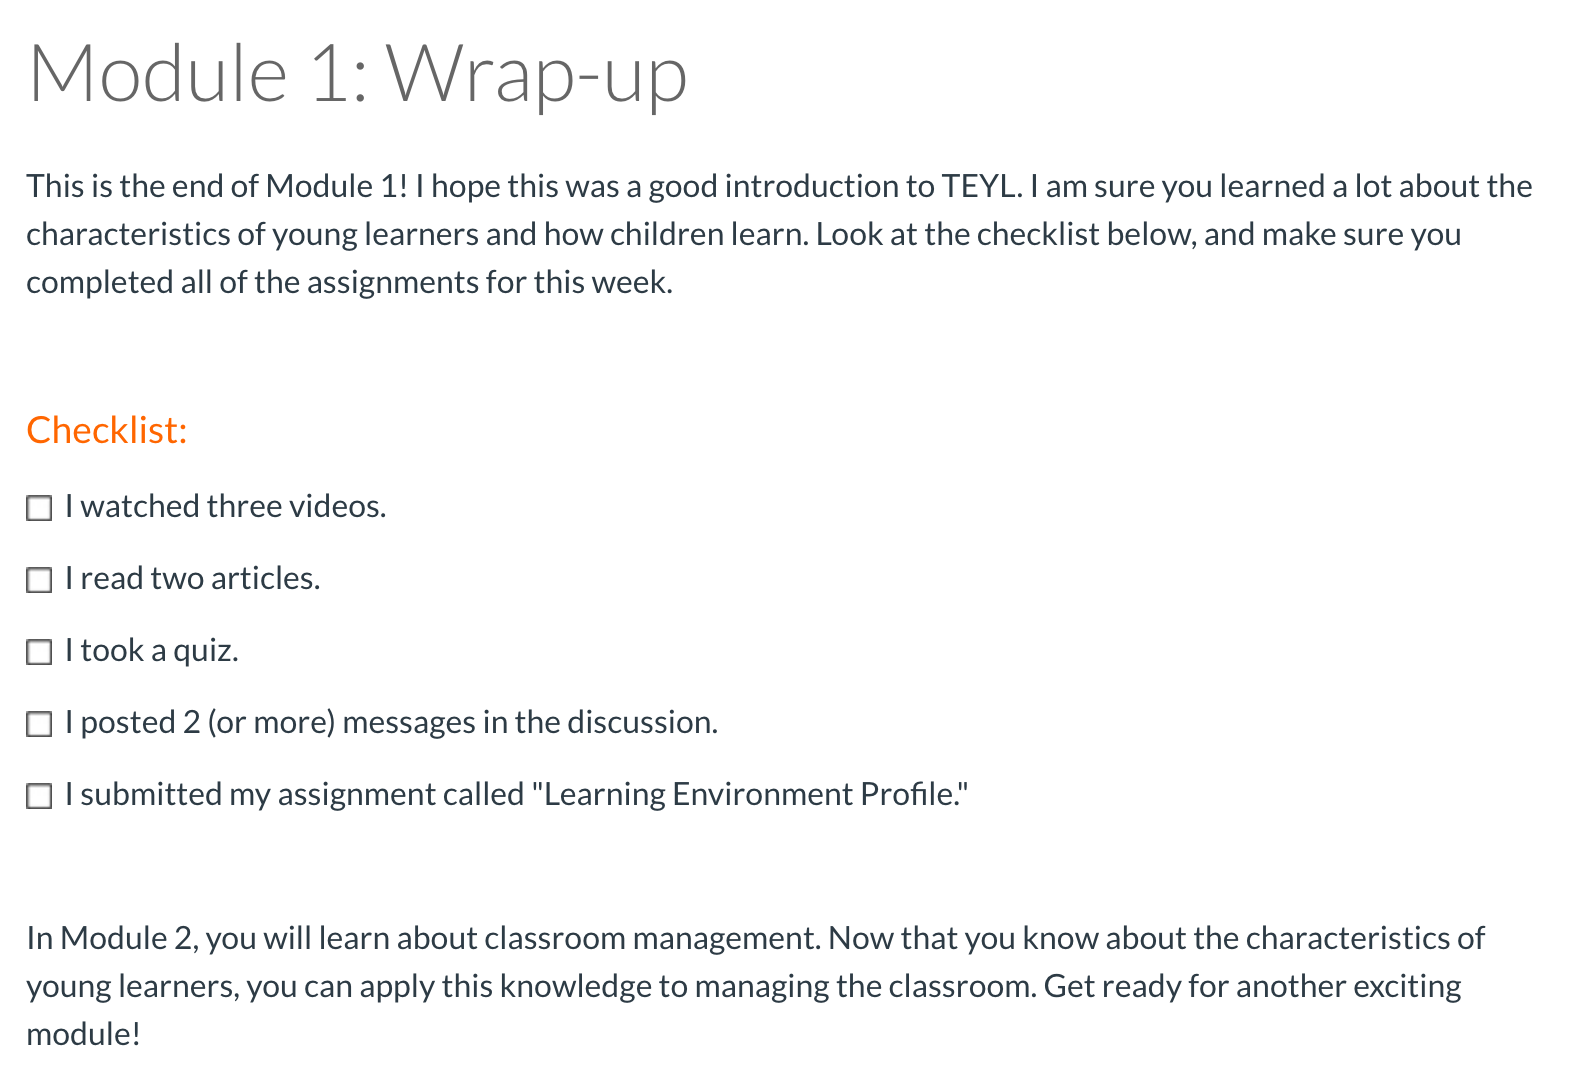
From the American English E-Teacher Program course Teaching English to Young Learners developed by George Mason University, administered by FHI 360, and sponsored by the U.S. Department of State
If the navigation and instructions for each module is clear, students can focus on studying and doing the course work instead of stressing out about where to go and what to do. Having a clear structure and routines helps students focus on the course work instead of spending time confused and wondering where to go and what to do.
Tip #12 Leverage the Power of Online Discussions

In-person discussions can be an amazing learning opportunity for students. At the same time, there are some significant challenges to in-person discussions. For instance, take a look at the image above. It looks like a great discussion, right? Six students are raising their hands to make comments! However, the problem is that it’s unlikely that all six of those students will have time to ask their question. In contrast, in an asynchronous (on-demand) online discussion all students have equal opportunity to comment. Additionally, in an in-person discussion, English language learners can find it difficult to comment in a fast moving discussion whereas online they have ample time to read other’s comments and reflect on what they would like to contribute before posting a comment.
Use Student Moderated Discussions
One way to encourage effective discussions is to have student-moderated discussions. Assigning students to facilitate the discussions can make them more engaging and productive. Using a starter-wrapper technique (Hara, Bonk, & Angeli, 2000; Shin, 2016; Shin & Bickel, 2012) is one useful way to have students take charge of the discussion board. Below is an example of how to assign the starter and wrapper roles (Shin, 2016; Shin & Bickel, 2012):
- Starter: This person will start the discussion by identifying an issue related to the topics and readings of the unit. S/he should post motivating starter questions and/or pose relevant problems. S/he will also keep the discussion going by getting participants to share ideas, explore the question(s), and think critically about the topics or problems posed.
- Wrapper: This person will continue the discussion and encourage participants to find solutions to the problems posed by using motivating questions (like the starter). S/he will integrate the ideas shared by the group and try to conclude the unit by highlighting all new ideas, solutions, and applications constructed through the discussion. S/he will write a wrap-up message that summarizes the main points and issues from the discussion.
For example, if you have set up a class with a weekly module that begins on a Wednesday, you could have the Starter begin the discussion on Thursday and keep it going through Monday. Then the Wrapper would pick up the discussion on Monday and keep it going through Wednesday. Using this technique can encourage students to take on a leadership role in class and be an active participant in the online learning community.
Asynchronous Video Communication
Students and teachers are increasingly sharing comments using video recordings. Flipgrid, EdConnect, VoiceThread, and Paddlet are all tools that allow students to view and share video comments. Video comments allow for authentic communication that can help students know that they are not alone in the course. However, students can feel a little uncomfortable recording video comments for the first time. As a result, we recommend that you start with a fun, low-stakes activity that gets students feeling comfortable with the tool. For instance, an ice-breaker is a great way for students to get to know each other while also getting to know the tool that they will be using to communicate. The following are two example ice-breaker activities that teachers recently participated in with their students using EdConnect.
Richard West Brigham Young University
Jered Borup George Mason University
Extra Tip (Baker’s Dozen!)
Tip #13 Don’t Do It Alone
Remember you are a part of a community with other teachers, parents, and most of all your students!
We commend scheduling regular times to meet with other teachers at your school using video communication tools such as Zoom. These no-agenda meetings allow for casual conversations and time to discuss challenges and share strategies that work.
Parents are also invested in their students’ learning but may not know how to best support them. Specific invitations to parents can provide them the guidance they need to get more involved in their students’ learning.
There are also lots of free resources that you can use to improve your online teaching. For instance, Jered Borup and his colleagues recently published a survey to help teachers know their strengths and areas for growth related to online and blended learning. The survey is also aligned to the book, K-12 Blended Teaching: A Guide to Personalized Learning and Online Integration. Both the survey and the book are totally free resources.
Conclusion
Remember these simple tips to make sure that your students feel confident and supported in the online learning environment. Build a strong sense of community among all your learners and be sure you find ways to provide plenty of personalized attention and feedback. Even though you are physically separated, you might find that you can become even closer to your students in a virtual learning environment. Be ready to learn more about your students in this new space for learning!
2 comments