

In this series of blog posts for 2020, Katherine shares ideas for creative mini-project lesson plans that encourage learners to take an interest in aspects of nature. The series will motivate learners to feel wonder, respect, and love for the natural world. Learners will develop traditional skills of reading, writing, speaking and listening and 21st-century life skills to help them grow into responsible citizens.

Day and Night Mini Project
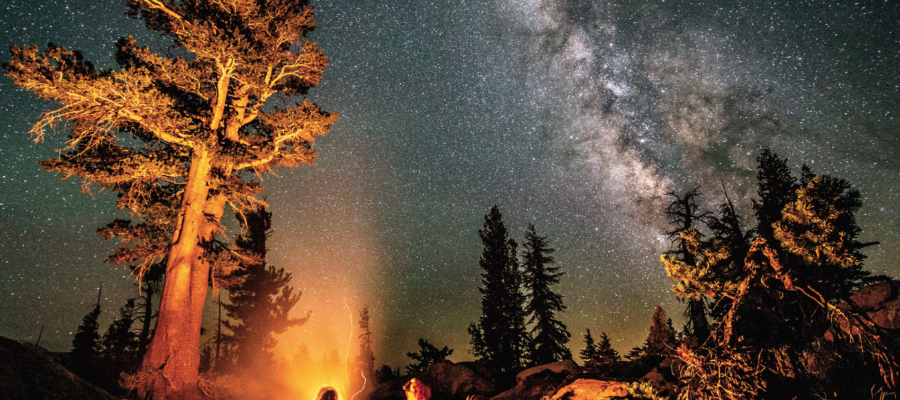
February’s blog post starts with learners developing visual literacy through a high impact photo of the night sky. Learners then follow supported and structured step-by-step tasks to create day and night pictures with descriptions.
| Focus: Day and night Skills: Listening, speaking, reading, writing, visual literacy, creativity, critical thinking Interaction: Individual and whole-class work Materials: One large piece of white paper and one smaller piece of paper per learner, pencils or crayons Evaluation: Statements for guided self-evaluation |
The photo: camping in the evening, Borneo, Indonesia
Display the photo for the learners to see. Ask a few questions about it. Start with specific questions and move on to questions that require more critical or creative thinking: What are these people? What can you see? What time of day is it? What are the people wearing? What are they looking at? How do you think they feel? What sounds can they hear? How did they get to this place? Why did they come here? Where are they going to sleep? Why do people like to see the night sky?
Background information
Copy the description below on one side of the board, read it aloud as you write, pausing before the words in bold for learners to suggest the next word. If anyone suggests a word that could also be correct, say That’s a good word too before continuing.
| This picture shows some boys in the countryside. There are no buildings or roads. There are some tall trees and some big rocks. It is nighttime and the boys are looking at the sky. There are millions of stars in the sky. It is very beautiful. The people are sitting around a fire. They are wearing coats and hats. It is a cold night but the fire is warm. |
Project
In this project learners make a picture showing the same scene in the day and at night. Then they write a description comparing the two scenes. They work individually.
Step 1. Language preparation
Draw a simple picture on the board showing a similar scene to the one in the photo but during the day. Draw some trees and rocks. Don’t draw a fire. Draw a clear sky, with the sun shining. Draw two people wearing T-shirts, standing on some big rocks, playing with a ball.
Copy this new description on the other side of the board, read it aloud as you write, pausing before the words in bold for learners to suggest the next word as you did with the previous description.
| This picture shows some boys in the countryside. There are no buildings or roads. There are some tall trees and some big rocks. It is daytime and the boys are playing with a ball. The sun is in the sky. It is very beautiful. The boys are standing on the rocks. They are wearing T-shirts. It is a warm day. |
Step 2. Getting ready to draw and write
Explain to learners that they are going to draw two pictures of the same outdoor place, one showing a day scene and the other showing a night scene. Then they are going to write two descriptions of the scenes.
Help learners get ideas for their pictures by brainstorming a list of possible elements around the class and writing them on the board. Ask What can you draw in both pictures?
For example: a tree, a building, a person, an animal, a mountain, a bridge, a road, a train, a lamp post, a statue, a river, the sea, some flowers, a car, a bike, a washing line with clothes, a scarecrow, a tractor, etc.
Provide each learner with a piece of paper and colored pencils or crayons. They should divide the paper in two by drawing a vertical line down the middle. Before they start drawing, put learners into pairs to tell each other what they are going to draw. They should choose a background and two or three elements. The pictures should be simple, not too detailed.
Step 3. Drawing, coloring, and writing
Give learners a limited time to draw their pictures. Make sure they understand that they should:
- draw the same scene in both pictures but with small changes because one is a day picture and the other is a night picture.
- color each picture differently to show day and night
- add detail to the sky in both pictures to show day and night.
When they finish their drawings, learners should write two short descriptions to go with them. Remind them that they can use the two model descriptions on the board, changing parts so that they describe their own pictures. Encourage learners to write their descriptions in rough first and then, after correcting them with you, to copy them neatly onto a piece of paper.
Step 4. Make a ‘Day and Night’ display
Make a classroom display of the pictures and descriptions and ask learners to look at each other’s work, giving each other positive feedback.
For example: That’s a lovely sky. I like the (cat) in your picture. Nice drawing! Etc.
Self-evaluation
A project of this kind is a good opportunity for self-evaluation. Write some statements on the board. Then read each one aloud and ask learners to think about whether or not it is true for them. Explain the meaning as necessary. Then ask them to copy the statements that are true into their notebooks under the heading: Day and night project: my work.
*Suggested statements
These can be adapted as appropriate depending on age and ability.
My pictures show the same place.
My pictures show day and night.
I did my best drawing.
I did my best coloring.
My description has a heading.
My writing is neat.
I used capital letters and full stops.
—
If you try this mini project in your class, let us know how it worked in the comments box below!
NICE
It’s a very good idea. That will help children how to appreciate this amazing world, because currently we are missing our time doing other things for example watching TV, playing video games and all that make us forget how to enjoy with our family a beautiful sunset, walk together and remember we are still alive.