

Each month in this blog post series, Katherine offers five practical and engaging classroom activities which all use the same photo as a starting point. The ideas can be adapted to work with all ages and levels and are designed to recycle language in an engaging way while developing a range of key skills for this age group. We encourage teachers to try out the ideas below and to write and tell us of any other ideas you have for using each month’s image.
All photos are from the pages of National Geographic Learning’s new primary coursebook, Look!
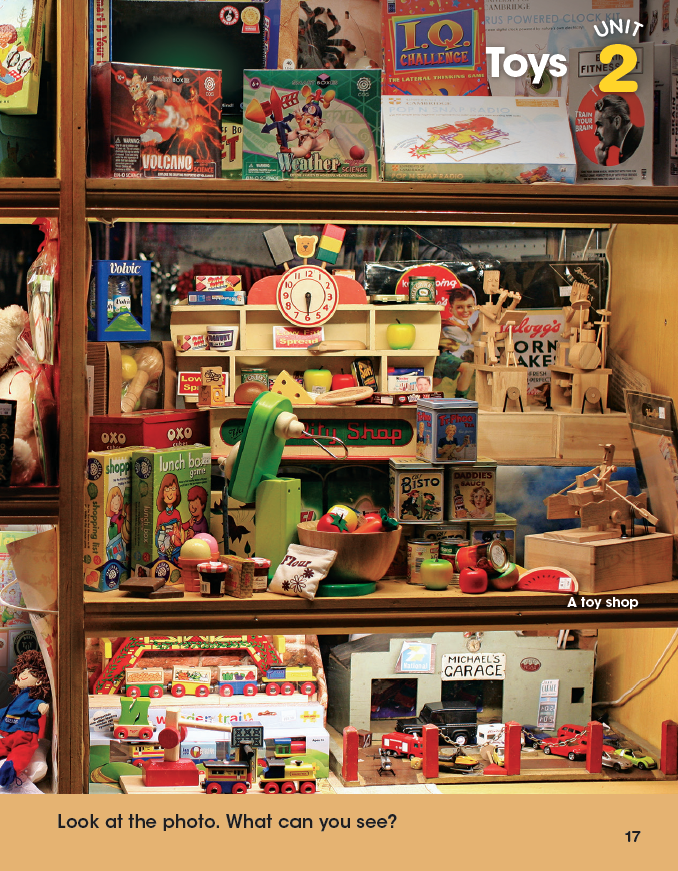
Toys!
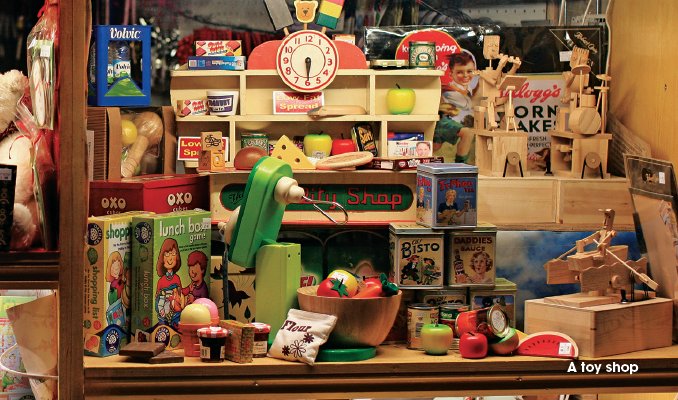
This photo shows a display of toys through the window of a toy shop. If you have a good idea of how to use it in a classroom, write a comment sharing your ideas in the blog below.
1. At the top!
Photos are perfect for teaching learners how to use positions of place. In this activity, learners watch and listen. Then they point and say. Finally, they listen and draw.
Display the photo and invite learners to look and think about it for a minute. Then point to the spider at the top of the picture and say Look! The spider is at the top of the photo. On the board write: The spider is at the top of the picture.
Point to a train at the bottom of the picture and say Look! The train is at the bottom of the photo. On the board write: The train is at the bottom of the picture.
Repeat this step, point and writing with these sentences:
The box is on the right of the picture.
The jam is on the left of the picture.
The tomato is in the middle of the picture.
Check that learners understand that the prepositions change. Invite a few learners to come up to the board to point and say a sentence like the ones on the board. They should choose a different object each time.
Explain to learners that now they are going to draw a picture following your instructions. Start a picture on the board by drawing a square for learners to copy. Then give drawing instructions using at the top/ bottom, on the right/left, in the middle.
E.g Draw a ball in the middle. Draw a doll at the top. Etc.
Learners listen and draw. Then they use the square on the board to draw the five objects in the correct places for learners to check.
Optional follow up: Learners can work in pairs, taking turns to give each other drawing instructions to practice the language further.
2. Find something to eat! (listening practice)
You can use photos with a lot of details or elements to recycle all kinds of language while providing learners with some listening practice. In this activity, learners have to listen, understand and point. They don’t have to produce any language themselves. This makes it an ideal activity for younger learners.
Put learners into two (or more) teams with an equal number of members. Display the photo and ask learners to look carefully and think about what they can see. Then give instructions to each team in turn. One person from the chosen team comes up to the board and points to an object. Award a point for each correct response. The winning team is the one with most points.
Suggested instructions:
Find something:
(verbs) to eat, to drink, to play with, to make a noise, to open, to move around in, etc.
(adjectives) round, square, long, short, big, small, etc.
(materials) made of … wood, paper, card, plastic, metal, etc.
Note: You can repeat some instructions but learners shout point to a different object each time.
3. Look, think and write! (A, B, C)
Detailed photos are ideal prompts for recycling vocabulary.
This photo of lots of toys is perfect for playing an alphabet game to activate learners’ knowledge of vocabulary. First, display the photo and put learners into pairs. Ask them to take turns saying things they can see in the photo. They shouldn’t repeat any words. Explain that they can say nouns or adjectives. E.g. clock, apple, round, blue.
After a few minutes, explain that learners are going to play an alphabet game. Ask the class to help you write the letters of the alphabet in a column (or several columns) on the board, leaving a space next to each letter to write a word. Point to the letter ‘t’ and ask Can you see something beginning with t? Accept any suggestions and write them next to the letter t. E.g. train, tomato, tin, toy.
Then ask learners to work in pairs. First, they copy the letter grid from the board. Then they have a limited time to find as many words as possible for each letter of the alphabet. Explain that you want them to write 15-20 words. This will allow learners to leave out more difficult letters such as k, q, u, x and z.
Suggested answers
apple, ball, car, drum, eye, flour, green, hair, I.Q. game, jumper, lorry, man, nose, old, pizza, red, shop, train, volcano, weather, yellow.
When learners finish, ask them to share their words. Write all of their suggestions on the board in the grid.
4. Look and find! Draw, show and tell!
A photo of a children’s world (in this case ‘toys’) is a great motivator to get learners speaking, thinking and personalizing. In this activity, learners start by remembering toy vocabulary. Then they find toys in the photo. This is followed by a personalized drawing activity that acts as a springboard for a Show and Tell speaking task. A final task brings everything together in a whole-class display.
Before starting the activity, prepare the final poster task by drawing a large widow frame on a big piece of paper or card. This is a shop window. Next, draw three or four shelves. Make sure there is enough space for a toy drawing by each of your learners.
Begin the activity by asking learners to make a list of toys. Write a list on the board, accepting any reasonable ideas. Then display the photo and ask them to see how many of the toys in their list are in the shop window.
Explain to learners that you are going to make a big picture of a toy shop window. Show them the poster with the window frame and shelves drawn. Then give each learner a piece of paper. Ask them to draw and color either their favorite toy or a toy they’d like to have. Give a limited time for this. E.g. 5 minutes.
Ask each learner to come to the front of the class and stick their toy picture on one of the shelves in the poster. They should first hold up their picture and describe their toy. A model text on the board is helpful.
Suggestion:
This is my favorite toy.
It’s a bike.
It’s blue and white.
I like it because it’s fun.
Display the poster in the classroom.
5. Listen, look and say! A guessing game
Photos with a lot of elements are ideal for playing memory games or guessing games. In this game, learners listen to clues about an object in the picture. When someone guesses correctly, they take a turn at giving the clues.
Display the photo. Explain that you are going to give learners some clues about an object in the picture. If they think they know the answer, they should put their hands up and not shout out.
Say a series of clues about an object. E.g. for the cheese under the clock:
I can see something yellow.
I can see a triangle.
I can see something to eat.
I can see something on the middle shelf.
When a learner guesses correctly, ask them to choose an object and give clues, one at a time. Then, when the next learner guesses, continue in the same way or put learners into small groups to play.
Write some prompts like this on the board for support:
I can see something blue/red/white
I can see something round/long
I can see something with holes/strips/numbers/words/wheels
I can see something to eat/play/open/move in
I can see something on the top/middle/bottom shelf
Have you tried any of these activities in class? Let us know how they’ve gone in the comments box below!
It’s interesting to study the preposition, think and write, describing what we look, and give Idea. Greet lesson. How to make the classroom interesting and happy.
Photos are the best teaching media besides videos. My students show great interest by using colourful pictures, especially their personal pictures.